Excel Tutorial, Lessons 1 and 2

Ever wonder how large corporations ran their accounts before the days of accounting software? If you guessed Spreadsheet Software, give yourself a pat on the back. It wasn't called MS-Excel back then (Bill Gates was still in his nappies… or just growing facial hair) – it had other names; like VisiCalc (for those who were around at that time) Lotus (I was surely around for this one) etc.
In fact spreadsheets were used for everything back then – accounts, inventory, payroll, scientific research… and not to be outdone, the gangsters used them too, to keep count of their earnings. To this day, some large corporations still rely on spreadsheets to run the core of their business. So why shouldn't you?
I will show you how you can use Excel to design a fully functional accounting software capable of meeting some of the less demanding accounting tasks. I am assuming that you have a rudimentary knowledge of MS-Excel so that I won't have to explain the difference between a "cell" and a "formula."
Overview
In this lesson we will look at how a few simple design concepts will carry us a long way in simplifying complex problems.
Methodology
I will follow a methodology called step-wise-refinement. This means that I will start out by developing a simple solution. Subsequent lessons will improve on this and refine the solution to work more efficiently… meaning the spreadsheet does more and more of the work, while you do less and less.
Data Layout
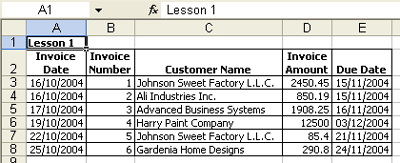
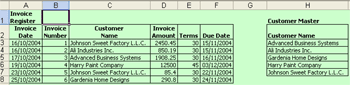
The above layout shows the best way to design a table of invoices. See how I have avoided empty columns or empty rows in between the data – the lack of empty rows and columns will save you countless hours of work later on. I have made sure that I just have a simple table. Each row contains information about a specific invoice – Invoice Date, Invoice Number, Customer Name, Invoice Amount and Due Date.
Each column has similar information. For example the second column contains only invoice numbers; the last column contains only the date on which the invoice is due.
Data Entry
This spreadsheet in itself is quite useful. Whenever you have a client who makes a purchase, you will record the Invoice Date, Invoice Number, Customer Name, Invoice Amount and the Due Date for this invoice.
In the example above I have five clients; Johnson Sweet Factory L.L.C., Ali Industries Inc., Advanced Business Systems, Harry Paint Company and Gardenia Home designs who have made various purchases. If you notice, all the companies have been given 30 days credit to pay their invoices, except for Harry Paint Company who have 45 days to settle their dues.
I am guessing that most of you are already doing this. If you want to see how this will really help you, go to Lesson 2 and see how really powerful this can get.
Review
• In order to design powerful solutions keep the data layout in the form of a table.
• Start from the cell A1.
• Avoid empty rows and columns. For example, you don't have to leave an empty row between the column titles and the data. The aim here is to develop a powerful solution; not beautiful presentation.
Lesson 2
Introduction__
Even a small business will generate a lot of invoices over time. The more data you enter, the bigger the chances are that you will make a mistake. There may be certain mistakes that may be unavoidable, like entering the name of the wrong customer, but there are some mistakes that certainly can be avoided, like making a spelling mistake in the customer's name. These data entry mistakes will cost you dearly in time and effort when it comes time to reconcile your balances. In this lesson I will teach you how to build into every spreadsheet you design steps to make sure that the data you enter is accurate.
-
First we'll review each column to see if the data we enter can be made secure. In the column for invoice data, you could possibly enter the wrong date, or type 23/10/4 instead of 23/10/04. This mistake will in turn affect the Aged Receivables statement that we will design in a later lesson. Since you will be entering this information in real time or at least in batch mode at the end of each day, the quickest way to get the date into a cell is to press CTRL; together and this will place the current date in the cell.
-
The next column contains the invoice number. The mistake you might make here is miss out an invoice number or duplicate an invoice number. Here's how we sort this out. Type in the starting invoice number, in this case, 1 in cell B3 . In the next cell below the first row, in this case B4 , put the formula =B3+1 . In cell B5 , you will type in the formula =B4+1 . By copying the formula to every cell below, you have a ready list of invoice numbers to use when you enter new invoices.
-
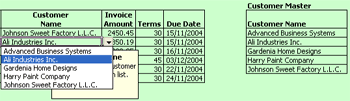
The next column, where you enter the customer name can be a little tricky. If you notice in the figure below, I have added another table called CUSTOMER MASTER . This table contains in alphabetical order, the list of all my customers. What I am going to do here is to create a drop-down-list on my table INVOICE REGISTER based on my table CUSTOMER MASTER . I have changed the background of the entire spreadsheet to show you how the drop-down-list works. As you can see, I am in cell C4 and there is a small drop-down button next to the cell. When I click on the drop-down button, I see a list of my customers, taken from the table CUSTOMER MASTER .
-
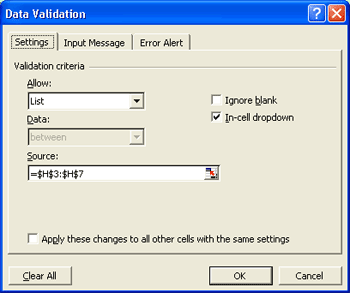
In order to do this, highlight column C from cell C3 all the way down to cell C20 (You can highlight more cells if you want to, but for this example, we will just highlight up to C20 ). On the Menu Bar , choose Data and click on Validation . You will see the following Dialog Window .
-
Under the Settings tab choose List and place your cursor on Source and highlight the names of the customers on the CUSTOMER MASTER . Make sure that the In-cell dropdown is selected. Move over to the Input Message tab.
-
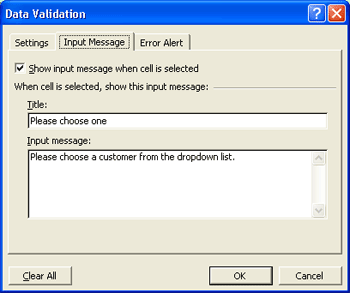
In case someone else has to enter data in this spreadsheet, you have to make sure they understand what to do here. The input message will prompt them with the proper instructions through a small window. Enter the window title and message as you see it here.
-
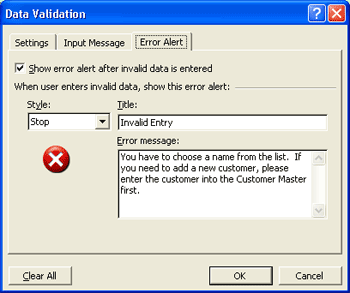
Move over to the Error Alert tab. This tab is used to inform the user if a value that does not belong in the cell is entered here.
-
This is the error message you will see when an invalid entry is made in the cell that is protected by Data Validation . As you can see, this is exactly the message that you typed in the Data Validation window.

-
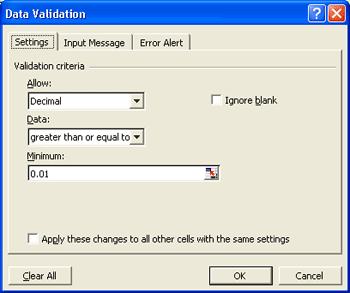
Moving over to the next column where you enter the Invoice Amount , you can again set Data Validation to make sure that only numbers are entered here.
-
This will make sure that only numbers greater than or equal to 0.01 can be entered here. You can set up the Input Message and Error Alert tabs as you please.
-
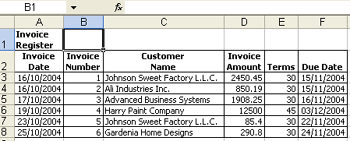
Next, we have a new column called Terms . Instead of figuring out when the invoice becomes due, we can simply enter the number of days credit this invoice receives and have the spreadsheet add this to the Invoice Date and show us the Due Date .
-
This takes us to the final column: Due Date . Here we enter a simple formula, for example, in cell F3 we enter =A3+E3 . This takes the Invoice Date in cell A3 and adds the value in Terms found in cell E3 to give us a date when this invoice becomes due. Copy this formula to the cells below.
- By copying the last row of the Invoice Register you can enter as many invoices as you want.


