De-duplicating cells in Excel-Solution 2

Continuing from the first example for de-duplicating cells in Excel, we see here a different problem that requires a different solution.
A few days ago, I came across an Excel table that containted the order information for a company. I was required to build a Customer Master file from the Orders worksheet. In the previous tutorial we considered the contents of every cell when checking for duplicates. This approach will no longer work in this example since we have to check for duplicates in only selected cells (Salutation, First Name, Last name) while ignoring the other cells which may not contain duplicate information (order number, item id, item description etc.)
Summary
We will first group the cells we are checking by combining them into one column. Then we will use the Excel COUNTIF function to find out if the current cell is the first, second, third or the nth occurrence of the value. To build our master file, we will extract only the first occurrence of each cell.
Detailed Solution
-
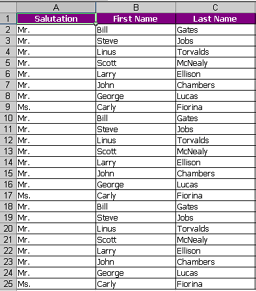
The following worksheet has three columns: Salutation, First Name and Last Name. For the purpose of this tutorial, each name has been duplicated twice.
-
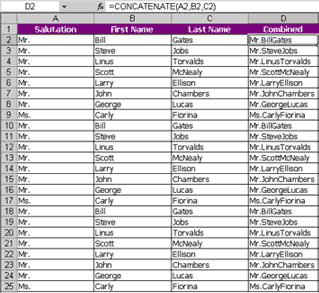
Next, we will combine the contents of all three columns into a new column by typing in the formula=CONCATENATE(A2,B2,C2) and copying the formula all the down to cell D25 .
-
In the next column E, type in the following formula: =COUNTIF($D$2:D2,D2) and copy it all the way down to cell E25 .

-
That was the easy part... now to explain how this works. If you look at the above picture, you will see that the first occurrence of each combined name in column D has been marked with a 1, the second occurrence has been marked with a 2 and the third occurrence has been marked with a 3. Later on we can sort by column E (Instance) and take only the values = 1 to form our Customer Master file.
-
To understand how the formula works, the formula in column E2 reads =COUNTIF($D$2:D2,D2) and the formula in columnE3 reads =COUNTIF($D$2:D3,D3) and the formula in column E25 reads =COUNTIF($D$2:D25,D25) . The COUNTIF function contains two parameters COUNTIF(X,Y) . The first parameterX is the range of cells to count. The second parameter Y is the condition on which to count within that range of cells.
-
In our example, let's look at the formula in cell E25 . It reads =COUNTIF($D$2:D25,D25) . This means we are telling Excel that the range to count is going to be from D2 to D25. In this case we have typed $D$2 so that this value stays the same when we copy the formula to all the cells.
-
The second parameter we have given is D25 . By this we are telling Excel to count all the cells in the range from D2 to D25 which equals the value of the cell in D25 which in this case is Ms.CarlyFiorina.
- If we look at the cells above the cell D25 we will notice that the the second part of the first parameter X always indicates the cell to the left of that cell. The reason we do this is because we want to identify the duplicate values. If we give the whole range for all the cells all we will get is the number of occurrences of each value next to all the cells. In this case our Instance column will show 3 in all the cells


