Conditional functions in Excel

In this lesson we will look at how to combine the information in multiple worksheets using one of Excel's least used features: the conditional functions . The power these functions bring to the user is enormous. They let you take the information in one sheet and analyse it against the information in another sheet.
This ideally serves our purpose as we are about to see how to match customer invoices against the payments they have made to arrive at the outstanding amount.
Data Entry
-
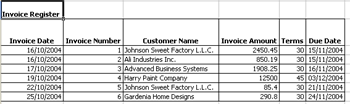
First, we create a RECEIPTS REGISTER . This is similar to the table we created in Lesson 1-The INVOICE REGISTER .
-
In column N we have the RECEIPT DATE . Whenever a customer pays for an invoice, you will come to this cell and press CTRL; . This will automatically insert today's date into the cell.
-
In column O we have the receipt number. For the first row of this table, you will have to enter the RECEIPT NUMBER manually. Subsequent cells below the first receipt number can have the formula =O4+1, =O5+1 etc., to automatically increment the RECEIPT NUMBER by 1.
-
If you have already read through Lesson 2, you can skip steps 6 through 10 .
-
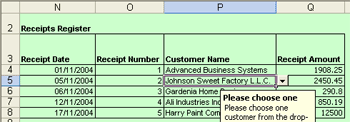
In column P we have CUSTOMER NAME . If you notice in the figure below, I have another table called CUSTOMER MASTER . This table contains in alphabetical order, the list of all my customers. What I am going to do here is to create a drop-down-list on my table RECEIPTS REGISTER based on my table CUSTOMER MASTER . I have changed the background of the entire spreadsheet to show you how the drop-down-list works. As you can see, I am in cell P5 and there is a small drop-down button next to the cell. When I click on the drop-down button, I see a list of my customers, taken from the table CUSTOMER MASTER .
-
In order to do this, highlight column P from cell P4 all the way down to cell P20 (You can highlight more cells if you want to, but for this example, we will just highlight up to C20 ). On the Menu Bar , choose Data and click on Validation . You will see the following Dialog Window .
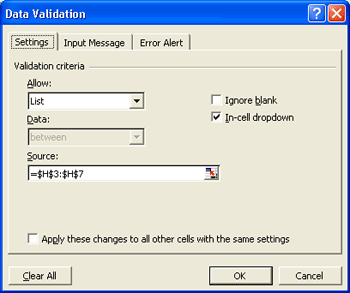
-
Under the Settings tab choose List and place your cursor on Source and highlight the names of the customers on the CUSTOMER MASTER . Make sure that the In-cell dropdown is selected. Move over to the Input Message tab.

-
In case someone else has to enter data in this spreadsheet, you have to make sure they understand what to do here. The input message will prompt them with the proper instructions through a small window. Enter the window title and message as you see it here.
-
Move over to the Error Alert tab. This tab is used to inform the user if a value that does not belong in the cell is entered here.
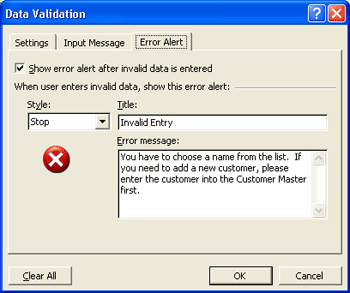
-
This is the error message you will see when an invalid entry is made in the cell that is protected by Data Validation . As you can see, this is exactly the message that you typed in the Data Validation window.

-
Moving over to the next column where you enter the Invoice Amount , you can again set Data Validation to make sure that only numbers are entered here.
-
This will make sure that only numbers greater than or equal to 0.01 can be entered here. You can set up the Input Message and Error Alert tabs as you please.
-
Going back to figure 2 above; in the final column Q , we enter the amount paid EVERY TIME a customer pays us. Remember, we are going to let the spreadhsheet do all the hard work. This means that we don't even try to add two separate receipts and put them in one row, we will simply enter a new row of information for a new receipt. We then plug in the formula, sit back and let Excel do all the work.
-
The entering of receipts was a pretty simple task. Now we have both the information relating to invoices and the information relating to receipts. So far we have done all the work in entering data; now it is time for Excel to do some calculating and tell us the total invoices a customer has, the total receipts a customer has the total amount outstanding that a customer has.
-
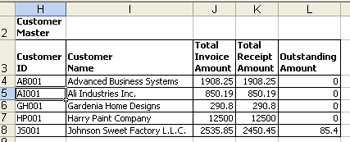
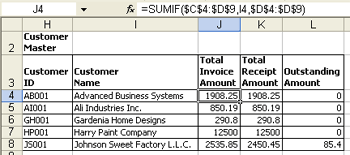
If you look at the above table, the CUSTOMER MASTER , it has changed somewhat from what we had earlier. I have inserted three new columns; TOTAL INVOICE AMOUNT , TOTAL RECEIPT AMOUNT , and OUTSTANDING AMOUNT .
-
Let's look at the first of these columns: column J . What I need to do here is take the information from my invoice register and sum all the amounts in INVOICE AMOUNT if the CUSTOMER NAME is Advanced Business Systems .
-
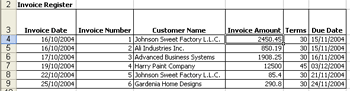
Since there is only one invoice in our INVOICE REGISTER for Advanced Business Systems , lets look at Johnson Sweet Factory L.L.C. , which has two invoices: Invoice number 1, dated 16/10/2004 for $2450.45 and Invoice number 5, dated 23/10/2004 for $85.40.
-
So the formula we enter in the CUSTOMER MASTER is quite simple: =SUMIF(C4:D9,I8,D4:D9) .
-
The SUMIF function will not indiscriminately add numbers, but will only add numbers as per a given condition. It contains three parts.
-
The first part, tells it which cells contain the information it has to look up: in this case from C4 to D9
- The next part, gives the condition on which to add these cells. In our case cell I8 . Now, cell I8 in the CUSTOMER MASTER contains the name " JOHNSON SWEET FACTORY ." Excel will now know to filter only those cells which contain the customer " JOHNSON SWEET FACTORY ." • The final part of the formula tells Excel which cells to add up: In our case, we just want it to add up from cell D4 to cell D9 .
- To review this function: We first tell Excel where the data is located, then we give Excel the condition for which to add the data, and finally we tell Excel which data to add.
-
- Going back to the CUSTOMER MASTER you will now see that the outstanding amount against " JOHNSON SWEET FACTORY " in cell L8 shows $85.40. Checking back with our INVOICE MASTER we see that the total for the invoices is $2535.85 and the total paid as per the RECEIPTS REGISTER is $2450.45 leaving us with an outstanding amount of $85.40. – Exactly the result given by the CUSTOMER MASTER .


Review
- We introduced a new concept in this lesson. Instead of going back to the RECEIPTS REGISTER and updating the total amount received by adding the amount of the latest receipt to the total already on the sheet, we enter a new line for each new receipt. This serves one very important purpose - modifying information can lead to inadvertent errors.
- We looked at the SUMIF spreadsheet function that lets us add only the numbers we want added up.