Custom Menus, Toolbars and Pop-Up Menus

Creating your own menus, toolbars and pop-up menus can considerably improve your Access application's usability and your user's overall impression of the application. This article aims to guide you through the process of getting started.
Please remember though: Never edit Access' existing menus, toolbars and pop-up menus if you intend to distribute your application. Always create your own from scratch as described.
Create A New Menu Bar
To create your first menu bar select Tools - Customize for the main menu.
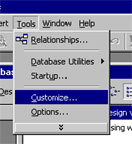
Figure 1
The Customize dialog will now show. Click on the "Toolbars" tab and then activate the "New" button. Enter a name for your custom tool bar and click on "OK".

Figure 2
Your new tool bar will appear just to the right of the Customize dialog. As we intend to create a menu bar, highlight the new tool bar in the Customize dialog and activate the "Properties" button. The Toolbar Properties dialog will now show and we can now select "Menu Bar" from the type list and close the Toolbar Properties dialog.
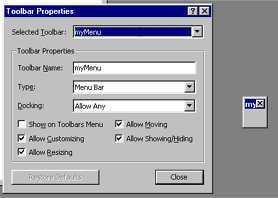
Figure 3
Add Menus And Commands
Now we can begin to add our menus and commands to the new menu bar. Let's start by adding a File menu and an Exit command. First, click on the "Commands" tab and scroll to the bottom of the categories list until you see the "New Menu" category. Highlight this category and select the "New Menu" command in the commands list to the right. Now drag and drop the new menu onto the menu bar that we just created. We want this new menu to be called "File" so right click on the new menu and enter "&File" as the new name.

Figure 4
To add the Exit command, all we have to do is scroll to the top of the Categories list and select the File category. Next select the Exit command from the commands list (in this case this is the very last command) and drag and drop it below our new File menu.
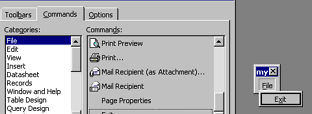
Figure 5
Now we can continue to add the rest of the menus and commands that we want our menu bar to have.
Create Custom Commands
In addition to using the intrinsic commands such as the exit command we can also create custom ones. For example, say we wanted a custom menu to open a specific form in our application. All we have to do is scroll to the top of the Categories list and select the File category and then select the "custom" command. Now drag and drop the custom command onto our menu bar, right click on it and give it an appropriate name.
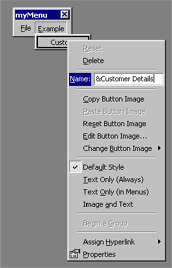
Figure 6
To open our form we have two options. We can either create a macro to open a specific form or alternatively we can write a public function in a general module.
Create A Macro
First close the customize dialog. Select "Macros" from the objects list in the database window. Click on the "New" command and the macro window will open. Choose the "Open Form" action and then select the form that you wish to open in the action arguments. Finally close the macro window and save the macro with an appropriate name.
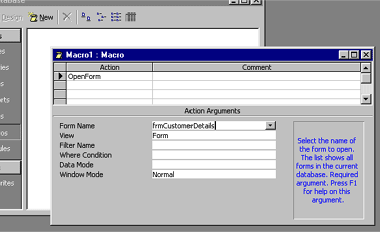
Figure 7
Create A Function
First close the customize dialog. Select "Modules" from the objects list in the database window. Click on the "New" command and the new module will open ready for your VBA code. Personally I prefer to write a generic function to open forms with the form name passed as an argument rather than writing separate functions for each form. For the generic function see the listing in figure 8.
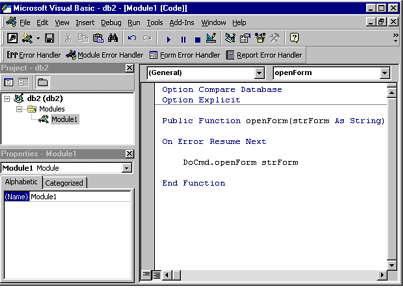
Figure 8
Save the module with an appropriate name and exit the VBA code editor.
Complete The Custom Command
Now that we have created either a macro or function to open our form all we have to do now is attach it to our custom command that we created earlier. Right click on our custom menu and select "Customize" or select Tools - Customize from the main menu. Next select the custom command we created and right click on it. Select the "Properties" option at the bottom of the pop-up menu.
To execute our macro all we have to do is select it from the "On Action" list.
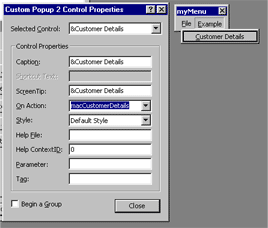
Figure 9
To execute our function instead simply type "=" followed by the function name into the "On Action" argument.
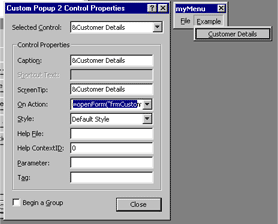
Figure 10
Default Menu Bar
Once all the menus and commands necessary have been added to the menu bar we can choose to have the new menu bar to be the application's default menu bar. Now is a good time to move the menu bar to an appropriate position. As this will be the default menu, move the menu bar to the top of the application until it snaps into place.
Figure 11
Next select Tools - Start-up from the main menu.
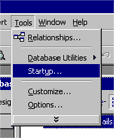
Figure 12
And the start up properties dialog will show. This allows us to change a number of start-up properties for our application. The one we're interested in is the Menu Bar property. Select our newly created menu bar from the list and click on "OK".
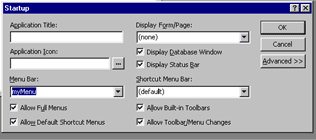
Figure 13
When we next open up the application our custom menu bar will be displayed at the top instead of the default MS Access one, giving the application a more professional look.
Toolbars
Tool bars are created the same way. The only difference is that you shouldn't change the type to "Menu Bar" as we did previously. In addition tool bars usually display an image instead of text for each command. Use the "Edit Button Image" and "Change Button Image" options available by right clicking on the desired menu command when the customize dialog is open to set an appropriate image and check the "Default Style" option. To hide the default MS Access toolbars, you can uncheck the option "Allow Built-in Toolbars" on the start-up dialog.
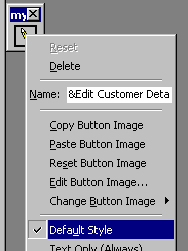
Figure 14
Pop-Up Menus
To create a pop-up menu change the toolbar's type to "Popup". To edit the new pop-up menu you have to check the "Shortcut Menus" option in the customize dialog to bring it into view. You custom pop-up menus are listed on the far right of the shortcut menu bar. You can now drag and drop commands onto the new pop-up menu as required.
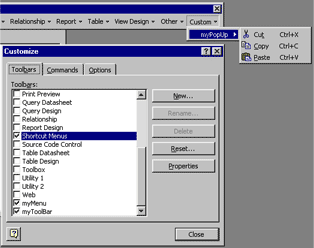
Figure 15
To use the pop-up menu throughout the application simply select it from the "Shortcut Menu Bar" list on the start-up dialog. Alternatively you can attach it to a specific form or control using the form/control properties dialog. You can also do the same with Menu Bars and Toolbars.
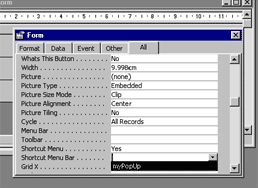
Figure 16
Further Notes
-
You can bypass the application's start-up properties by holding down the SHIFT key when you open the database. This will allow you to edit the application further by bringing the MS Access default menus into view.
-
Custom menus and tool bars can be exported and imported to a new database in the same way that you can export tables, queries and forms etc (providing the database is not an MDE). Just activate the "Options" button at the bottom of the Import/Export dialog and select the "Menus and Toolbars" check box at the bottom left.
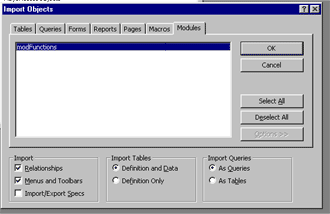
Figure 17
- You can assign icons to your menu commands using the "Edit Button Image" and "Change Button Image" options available by right clicking on the desired menu command when the customize dialog is open.

Conclusion
Having covered the basics of creating your own custom menus, toolbars and pop-up menus, you are now ready to start implementing them throughout your own projects. Please take note of the warning at the start of this article "Never edit Access' existing menus, toolbars and pop-up menus if you intend to distribute your application. Always create your own from scratch as described." If you do edit the existing menus, toolbars and pop-up menus, then the new layout will only be available on your installation of Access, not on your end user's copy.
(This article is provided "AS IS" with no warranties or guarantees.)